Rag Quilted Mug Rugs and Coasters

If you have a sewing machine that does embroidery or if you have some small embroidery designs that you would like to do by hand, here  are instructions for turning your design into a rag quilted mug rug or coaster.  You could do the same thing with a design that is already on a garment that is past it’s prime.

Rag quilting eliminates the need to apply binding to the edges of your creation, so you can quickly make several of these to use for yourself or to give as gifts.  This is an ideal first project for someone just learning how to sew.

Have fun!

Posted in Country By Design, Quilting | Tagged , , , | Leave a comment

Free quilting patterns

I love quilting pattern even if they aren’t free, so finding free ones is a bonus.  Sometimes an idea is a complication design will inspire me to try something much simpler.  I’ve always liked flying geese, perhaps because I find it hard to make.  I really like this new take on the flying geese block.  Hope you do to0.  www.freequiltpattern.info/#spiralgeese

FREE Tutorial – Spiral Geese Mini Quilt by Janice Zeller

– Click Image to Enlarge –
Isn’t this a beautiful design? Janice Zeller ofBetter Off Thread created this wonderful mini quilt and her tutorial is very well detailed and clear in its instruction.  This project is great for any level of quilter.  More from Janice:

My latest finish is my spiral of geese mini quilt for Fab Little Quilt Swap. It measures 20″x 20″ and consists of 50 paper-pieced flying geese on a reverse appliqued background.

I quilted it on my Juki using both my walking foot and free-motion foot. The fabrics are all from my stash and the background is Kona White.”

Finished Size: 20″ x 20″ (51cm x 51cm)

Skill Level: Beginner

Posted in Country By Design | Tagged , , , | Leave a comment

Binding your quilt by machine

I prefer to hand bind most of my quilts, but occasionally I will bind one by machine.  I haven’t watched this webinar, but it looks like it would cover all the bases if you are new to machine binding.  I’m sure I could pick up a few tips, too.

http://view.e.quiltingdaily.com/?j=fec4137276630079&m=fe90157370600c7b71&ls=fded15737c6c00797013717d&l=feca15717266077a&s=fe1e16747d640d75731779&jb=ff971272&ju=fe5a167771670d7a7014&et_mid=723744&rid=248098639&r=0

Posted in Country By Design | Tagged , | Leave a comment

Capt. John King, my 9th great grandfather

Continuing with the King family, I will talk about Capt. John King today.  John King, my 9th ggf, came to America with at least two brothers, Ralph and Thomas.  John was captain of the ship Falcon and was involved in trade with Barbadoes in 1863.  By 1642, he had married and had at least three sons, and was living in Charles City, VA.  John had married Ann Daniel in 1589.  Some genealogies list her father as Piers Daniel, but other sources list other parents.  She is believed to have been born about 1574 in Cheshire.  John had been born in Cheshire four years earlier, in 1570.

Francis is the only son that I know much about.  He was born in 1589 and died in 1653.  He was married twice, first to Dorothy Aston and then to Elizabeth Brooke.

It appears that his brother Michael (1594-1662) settled in Norfolk, VA.  Robert was the youngest, being born in 1600.  His date of death is given as 1650.

Capt. John King’s wife, Ann, lived until 1653.  John lived until 1669 and is buried in the Burton Parish Courtyard at Williamsburg, VA.

I will continue the King family story with more about Francis in my next post.  The names of his children and to whom they were married is a bit confusing.  Hopefully I can get them sorted out!

Posted in genealogy, history | Tagged , , , , , , , , , , | Leave a comment

Making a twin size quilt

Jacob's twin size quilt

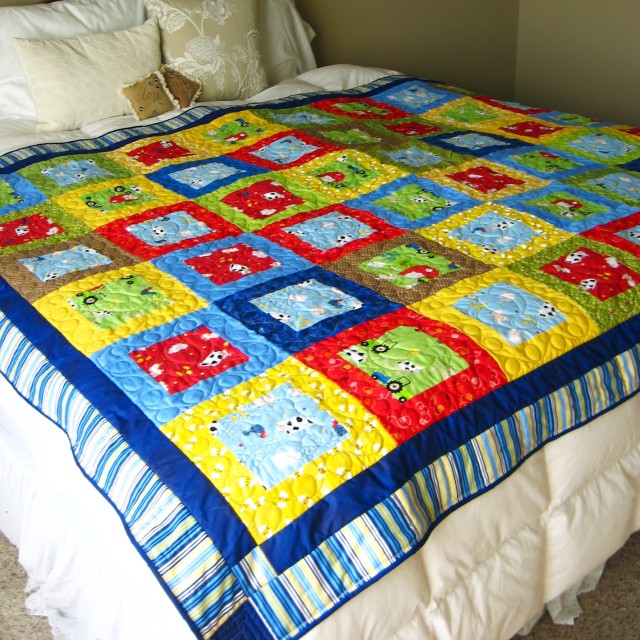
Jacob’s twin size quilt

Some time ago my oldest grandson had ask me to make him a quilt.  I had made him a baby quilt before he was born, but that was ten years ago.  Now he wanted one big enough for a twin size bed.  He lives on a farm and I had some primary colored fabrics with whimsical farm animals that would be nice.  But how to combine them to make a twin size quilt?  Most of my projects are table runners or smaller.  However, I had set together two queen size quilt tops with embroidered blocks, so I knew I could do it.  I decided to use a simple design and big squares to make the project go faster, and to show off the animals in the print fabrics.

The first thing I did was cut all the animal print fabrics into 8 1/2 inch squares so I could see if I had enough to do the project.  I ended up with just enough!  The next challenge was to pick out other primary color fabrics to use as frames for each square.  If I were to do this again, I might try to find another green fabric to use instead of the brown.  The frames for each squares are two pieces that are 2 1/2 by 8 1/2 for the top and bottom of each square, and two pieces that are 2 1/2 by 12 1/2 for the sides of each square.  As much as possible, I tried to make sure that each row, vertically and horizontally, had a different colors square in the center.  I also tried to make sure that no two squares with the same borders were side by side.  I didn’t quite make that work out.  I have two places where yellow borders are touching.  It is also important to balance lights and darks so that one side or end of the quilt isn’t “heavier” than the other.  After I had all the squares made and stitched together, I took the top up and spread it out on a queen size bed.  One corner had a lot of dark blue in it and the opposite corner didn’t have any.  So I took some of the seams apart and moved some of the squares around.  It was a royal pain, but I’m glad I took the time to do it.

I chose dark blue of the inner border to tie all the squares together.  I had planned to use a lighter blue, perhaps a print, as the outer border, but when I saw this yellow and blue striped fabric, I knew that was what I wanted.  There are online calculators that will help you figure out how much fabric you need for the width and length of border you need.  I like to use corner squares rather than mitering the corners.  You can also run the strips by, just like you do for the squares in the quilt, but corner squares are more fun.

For the backing, I had a piece of flannel with a cute puppy print, so I added a dark red fabric to the sides and bottom of the piece of flannel to make it big enough.  The finished size is about 70 inches by 90 inches.  The photo was taken laying across a king size bed.

I knew I didn’t want to try to quilt anything this big on my Bernina, and I had already taken a couple of quilt tops to a local quilt shop, so I trusted Brenda with this one, too.  Each frame has continuous swirls and each square has an animal.  I’ll post a couple more pictures so you can see what I mean about the animals.  There are horses, cows, pigs, bees, ducks, and more.

I had thought about using a dark red for the border, but changed my mind and went back to the dark blue.  I stitched it front and back by machine so it will stand up to much use and washing.  I still have to make a label, then it will be ready to go.

Close up of front showing duck quilting.

Close up of front showing duck quilting.

Close up of bac showing pig quilting.

Close up of back showing pig quilting.

If you have any questions about how I did this, just leave me a comment and I will try to help!

Posted in Country By Design | Tagged , , , | Leave a comment

Batik table runner

I have always loved batik fabrics, but couldn’t figure out how to use them.  Then I saw directions for making a quilt using a design called “Yellow Brick Road”.  The basic idea is to decide how big you want your finished quilt top to be, then figure out how big you want each square to be, depending on the size of the finished item.  Bigger squares for bigger projects and smaller squares for smaller projects.  Then once you have decided on a size for each square, the fun part starts.

Yellow brick road squares are constructed from a variety of squares and rectangles that can be stitched together to make a square the size you need.  For example, if you want your finished square to be 12 inches, you could stitch together two pieces that measured 12 inches by 6 1/4 inch, or two pieces that were 4 1/4 and 8 1/4.  The variations are limitless!

Most of my squares in this table runner have five or six different fabrics.  Usually one long rectangle combined with several smaller squares and rectangles.  The only rule is that no seams or colors can touch when stitching the squares together.  I followed that rule in this table runner.

Then I added a gold border and quilted around each shape with dark purple thread.  The border has four rows of quilting.  I added teal corner squares and a lavender binding.

Here are some pictures.  And here is a link to my Etsy site is you would like to see more pictures:  www.countrybydesign.etsy.com.

Batik table runner

Batik table runner

Batik table runner

Batik table runner

Posted in Country By Design, Etsy | Tagged , , | 3 Comments

Scrappy pencil case

I made a pencil-case with the same fabrics I used in the clutch.  I saw directions for making a flat pencil-case online some time ago, and once I figured out the basics of attaching the zipper to the two front edges of the top fabric and attaching the lining to the zipper, too, the rest is just a matter of making the case any size you like.  Mine are determined by the size of the zipper I happen to have on hand.  I watch for zippers on sale at Wal-Mart and Hobby Lobby.  Adding a small piece of fabric at each end of the zipper tape makes the case look more professional.  And makes it easier to insert.  I have managed to lose my zipper foot somewhere, but I was able to use a different foot on my Bernina 1008.  Doesn’t work the same, but it got the job done.

Here’s the latest.  Check it out at http://www.countrybydesign.etsy.com.

scrappy pencil case

scrappy pencil case

Posted in Country By Design, Etsy | Tagged , , , , | Leave a comment

Scrappy clutch bag for Etsy

I have been neglecting my Etsy shop this summer, what with moving and one thing and another.  But I am making an attempt to correct that situation.  And make things using scraps from my stash.  Here is my latest effort.  You can see this and more at http://www.countrybydesign.etsy.com.

Clutch bag with wrist strap
Posted in Uncategorized | Tagged | Leave a comment

Brown Sugar Zucchini Bread

A lot of water has gone under the bridge since my last post here, and I may, at some point, try to fill in the blanks, but for right now, I’m going to pick up fresh and start over!

Brown sugar zucchini bread

We don’t have a garden this summer, so I didn’t mind finding stray zucchini on my kitchen counter.  I tried one zucchini bread recipe that I thought was the one that I really liked last year, but it didn’t have very much flavor, so I went looking for another recipe.  It was hard to decide since they are a dime a dozen on the internet.  This one caught my eye because it calls for oatmeal, which I like a lot.  The more fiber the better.


Here’s the original recipe for brown sugar zucchini bread.


And here’s my version.

Oatmeal Zucchini Bread

2 cups all-purpose flour

1/2 cup packed light brown sugar

1/2 cup granulated sugar

1 1/2 tsp ground cinnamon

1/2 tsp ground ginger

1 tsp baking soda

1/2 tsp baking powder

1 tsp salt

1 cup old-fashioned rolled oats

3 large eggs

3/4 cup canola oil

2 tsp pure vanilla extract

3 cups grated zucchini

1 cup chopped walnuts

Preheat oven to 350.  Grease and sugar 5 mini loaf pans.

Stir together all dry ingredients in large mixing bowl.  Combine eggs, oil and vanilla and add to bowl.  Stir in zucchini and nuts.

Divide batter between pans and bake for 35 to 40 minutes.

This recipe was adapted from the Food Network, but I think I made enough changes to call it my own.  Enjoy!


Posted in Recipes | Tagged , , , , | 2 Comments

He is present. He is good.

He is present. He is good..

Posted in Uncategorized | Leave a comment