
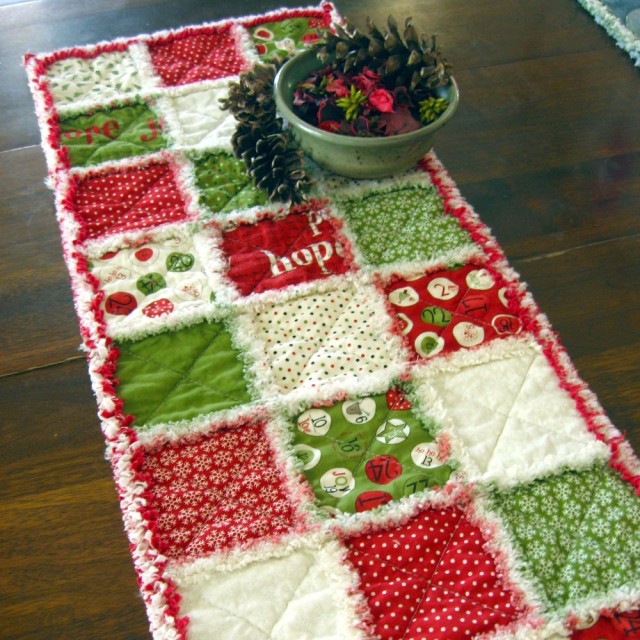
Rag quilted table runner for the holidays
I made this table runner in October of 2011, but this picture has suddenly resurfaced and created quite a bit of interest. It is/was very striking, using fabrics from Moda’s Countdown to Christmas charm packs.
There are lots of tutorials and sets of directions on the web for making rag quilted table runners, but I taught myself how to do it after seeing a rag quilt at a quilt shop several years ago. Most of the other directions will give you about the same results, but I still like my way best!
Here’s how I made this table runner.
1. Pick out contrasting squares of fabric from a Moda charm pack or cut 5 inch squares from the fabric of your choice. Arrange in an attractive way, such as the diagonal rows in this runner.
2. Cut squares out of a backing fabric, the same number and size as the number of squares for the top. I like to use white or off-white muslin or other similar fabric that has a low thread count.
3. Cut the same number of squares from batting of your choice. I like Warm and Natural best. Cut your batting squares one inch smaller than the top and backing squares.
4. Make “sandwiches” by laying the backing fabric on your work surface. Center a batting square on the backing square. Add the top layer, matching raw edges.
5. Stitch an X from corner to corner through all three layers in each sandwich. You can mark the top or bottom square if needed to get straight lines.
6. When each square has been stitched, rearrange the squares into the rows as seen in the picture.
7. Stitch the squares into sets in each row by placing the “sandwiches” with the backing of adjoining squares together and the top sides to the outside. Stitch with a 1/2 inch seam so that the seams are all to the front of the runner. After stitching the squares into rows, press open all of the seams. Then fold the backs together again as they were during stitching, and clip each seam with shape scissors. You can easily clip through all four layers, about 1/8 inch apart, staying 5/8 inch away from the raw edges on each side.
8. When each row has been clipped, lay then out again to check placement. Now it is time to join the rows together in the same way you joined the squares, with wrong sides together and right sides out. Stitch a 1/2 inch seam, matching seams at edges of squares and holding the seam allowances open. Press these seams open and clip just like you did on the squares.
9. Cut a one inch wide strip of red fabric and a one inch wide strip of white fabric, the same distance as the distance around the outer edges of the runner. It is fine to have more than one strip. Just over-lap the ends as needed. Place the runner right side up on your work surface. Place the red strip right side down along the edge with outside edges matching. Place the white strip right side down on top of the red strip. Stitch through all four layers with a 1/2 inch seam. Do the short ends first, pressing the strips over so the raw edges are to the outside. Do the long sides, covering the ends of the first set of strips. You will end up with 10 layers of fabric in the corners! Press the long strips to the outside with raw edges even. At the corners, stitch a short seam through all the layers on the long sides, 1/2 inch from the edge to hold the corners in place. Now you are ready to clip the borders. This works best if you clip the top two layers almost to the seam line at each corner and fold those layers back so you only have to clip through the bottom four layers. Clip all the way around the runner at 1/8 inch intervals, avoiding the seams, and stopping when you get to the corners, which aren’t clipped. Clip the top two layers in the same way.
10. Take your runner outside and shake off the loose threads. Machine wash and dry the finished runner to fray out the clipped seams.
11. Enjoy your finished runner!

so pretty…this year I hope to try this…
You should! The important thing is cutting straight lines and stitching straight seams. Although this type of quilting is more forgiving of mistakes, you will be happier with the results if everything is perfect.
The extra inch of red and white for added “fluff” or for binding? Not sure about that step. Thanks!!
Pingback: Pink baby lovie with green frogs | Country By Design's Blog
Beautiful! I have made 4 baby rag quilts so far using flannel. I recommend that the quilt be taken to the laundromat to be washed & dried – their machines are better equipped to handle the excess threads. We don’t want to be clogging up our machines! I also take it outside after washing and give it a good shaking – this helps to get rid of some of the loose threads before putting it in the dryer. Then I bring it home and give it another round of washing/drying. I haven’t used a border on my rag quilts – maybe I’ll try that next time!
That’s great! So glad you are having fun making quilts. Do try one with borders. Happy Quilting!
Linda
I just finished my table runner, it looks amazing!! Thank you for the directions!!
Fantastic! Happy Holidays and Happy Quilting!